While the ability to gain administrative privileges was available on the first day itself, even the popular custom recovery TWRP has made its way for this device. But that’s not it. The latest version of one of the most popular custom ROMs, LineageOS, is now available for your device. The icing on the top is that it’s already in the official state. So without further ado, let’s start off with the guide to install the latest LineageOS 18.1 onto your OnePlus 9 Pro device. Follow along.
How to Install LineageOS 18.1 [Android 11] on OnePlus 9 Pro
The below instructions are listed under separate sections for ease of understanding. Make sure to follow in the exact same sequence as mentioned. Droidwin and its members wouldn’t be held responsible in case of a thermonuclear war, your alarm doesn’t wake you up, or if anything happens to your device and data by performing the below steps.
STEP 1: Install Android SDK
First and foremost, you will have to install the Android SDK Platform Tools on your PC. This is the official ADB and Fastboot binary provided by Google and is the only recommended one. So download it and then extract it to any convenient location on your PC. Doing so will give you the platform-tools folder, which will be used throughout this guide.
STEP 2: Enable USB Debugging and OEM Unlocking
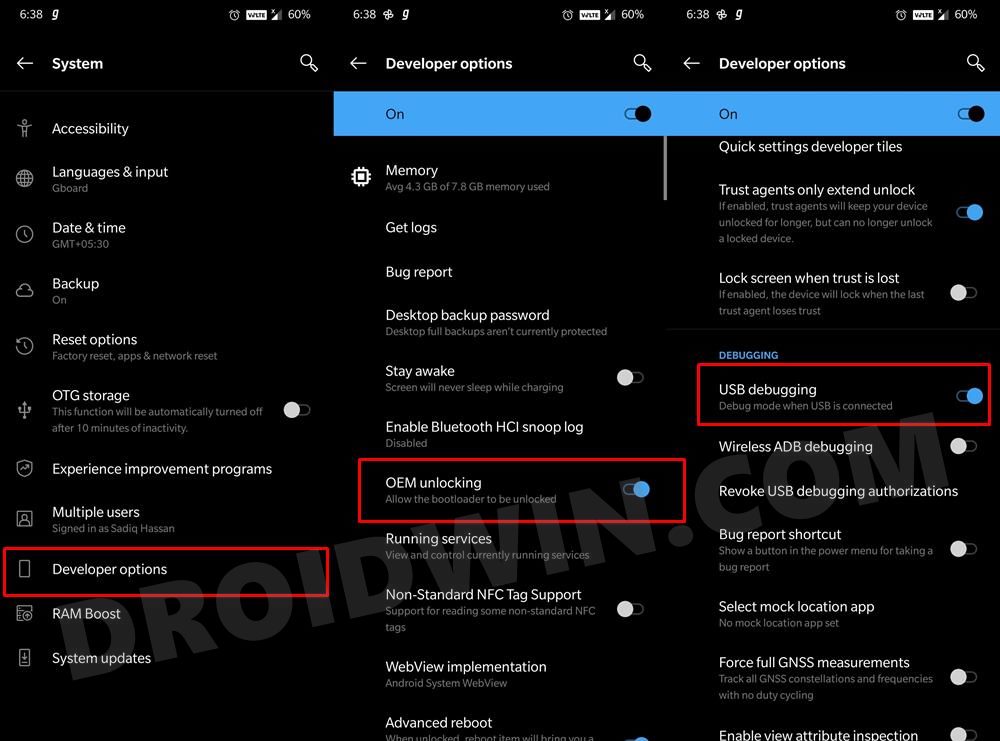
Next up, you will also have to enable USB Debugging and OEM Unlocking on your device. The former will make your device recognizable by the PC in ADB mode. This will then allow you to boot your device to Fastboot Mode. On the other hand, OEM Unlocking is required to carry out the bootloader unlocking process.
So head over to Settings > About Phone > Tap on Build Number 7 times > Go back to Settings > System > Advanced > Developer Options > Enable USB Debugging and OEM Unlocking.
STEP 3: Boot to Fastboot Mode
STEP 4: Unlock Bootloader on OnePlus 9 Pro
You will now have to unlock the bootloader on your device. Doing so will wipe off all the data and could also nullify the device’s warranty as well. If that’s fine, then execute the below command in the CMD window:
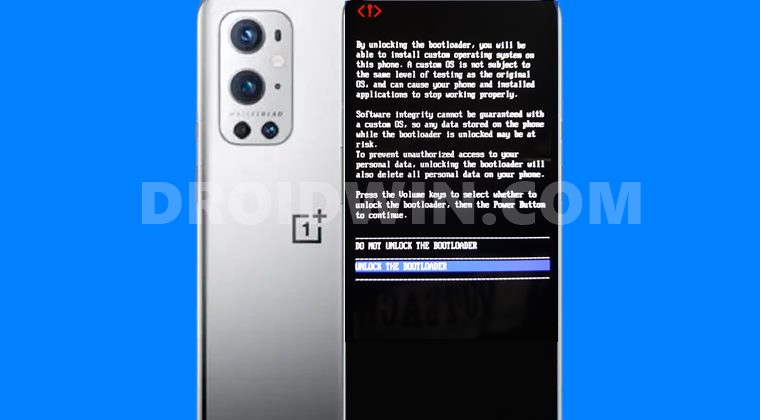
You will now get a confirmation prompt on your device. Use the Volume Keys to highlight Unlock the Bootloader and press the power key to confirm it. Your device will undergo a factory reset and the bootloader stands unlocked. [Don’t restore the data now, as your device would undergo a factory reset once more later on. So it’s better to restore at the end].
STEP 5: Install LineageOS Recovery on OnePlus 9 Pro
Now that the bootloader is unlocked, we may proceed with the rest of the steps of this guide to install the latest LineageOS 18.1 onto your OnePlus 9 Pro device. Follow along
STEP 6: Copy Slot A Contents to Slot B
Well, this is something new! In some instances, Slot B can be left unpopulated or might be having a much older firmware than Slot A. This conflict of data between both these slots could spell out trouble for the device. Therefore, the best route forward is to copy the entire content of Slot A to Slot B, which could be done as follows: The copy-partitions script was created by LineageOS developer erfanoabdi and filipepferraz, but isn’t signed with LineageOS’s official key, and therefore when it is sideloaded, Lineage Recovery will present a screen that says Signature verification failed, this is expected, please click Continue.
STEP 7: Remove Encryption on OnePlus 9 Pro
STEP 8: Install LineageOS 18.1 on OnePlus 9 Pro
STEP 9: Flashing Other Mods [Optional]
That’s it. These were the steps to install the LineageOS 18.1 on the OnePlus 9 Pro. If you have any queries concerning the aforementioned steps, do let us know in the comments. We will get back to you with a solution at the earliest.
How to Root LineageOS ROM using TWRP RecoveryHow to Root LineageOS ROM via Magisk Boot.imgInstall LineageOS 18.1 Android 11 on any DeviceHow to Replace LineageOS Recovery with TWRP
About Chief Editor


