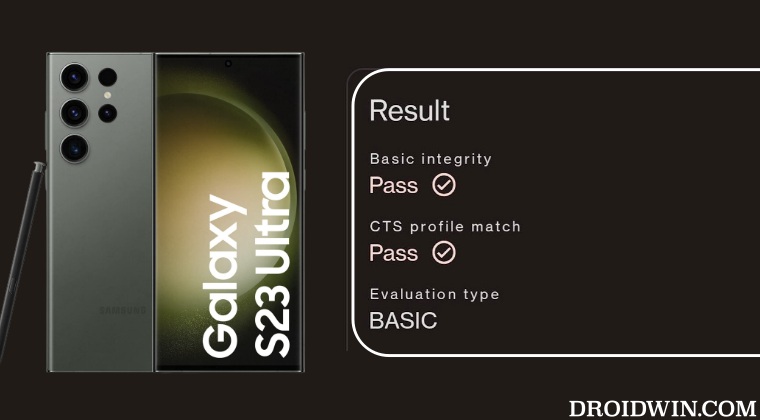
Well, it has only been a few days since its launch and the rooting binary is already live and a custom recovery is also in development. So if you have gained administrative privileges via Magisk patched AP, then you could welcome abode a plenitude of mods on your device. On the flip side though, it will also end up tripping the SafetyNet flag, which in turn will result in your inability to use backing and payment apps. Moreover, games in which you could gain an undue advantage via location spoofing might also refuse to work. Fortunately, as opposed to Knox, you could easily deal with this caveat. In other words, you could easily pass SafetyNet on your rooted Galaxy S23/Plus/Ultra. And in this guide, we will show you how to do just that. So without further ado, let’s get started.
How to Pass SafetyNet on Rooted Galaxy S23/Plus/Ultra
We have listed two different methods to get this job done. The first one is the newer/shorter/easier of the two and is usually the recommended one. However, if you are looking to tweak some additional aspects of your device [such as changing its fingerprint to any other device or spoofing the Android version, then you could try out the second method.
METHOD 1: Pass SafetyNet without Magisk Hide Props Config [NEW]
The shorter of the two methods, this doesn’t require you to spoof the device’s fingerprint or flash the Magisk Hide Props Config, all thanks to tweaks made by the developer of the Universal SafetyNet Fix Module. So on that note, let’s get started with the steps to pass Safetynet on your rooted Galaxy S23/Plus/Ultra
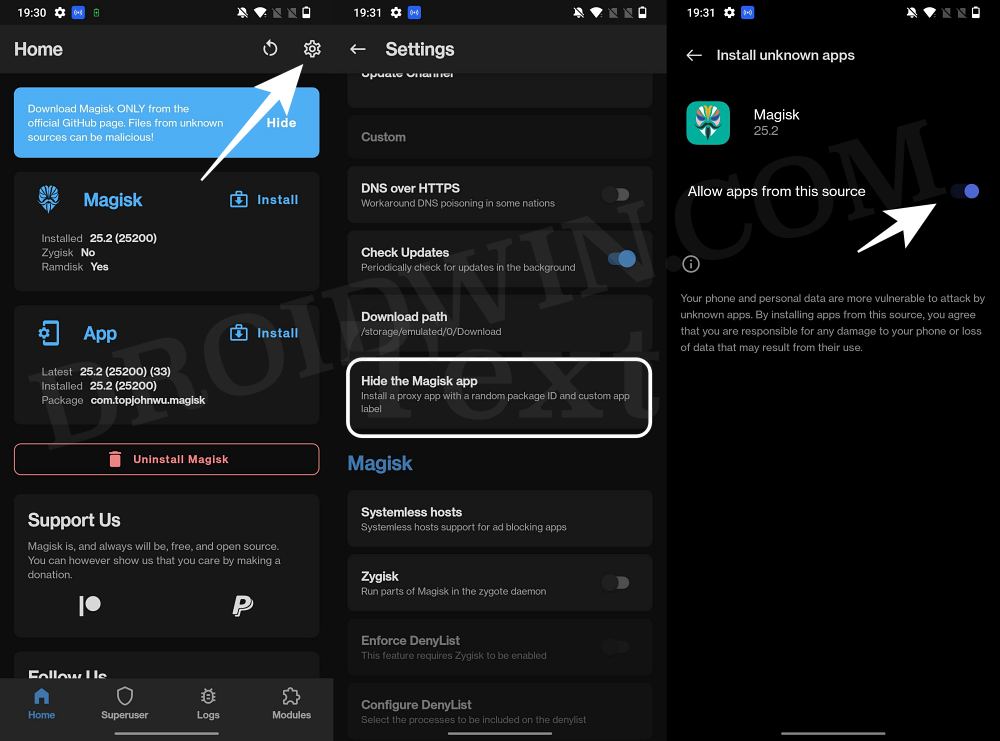
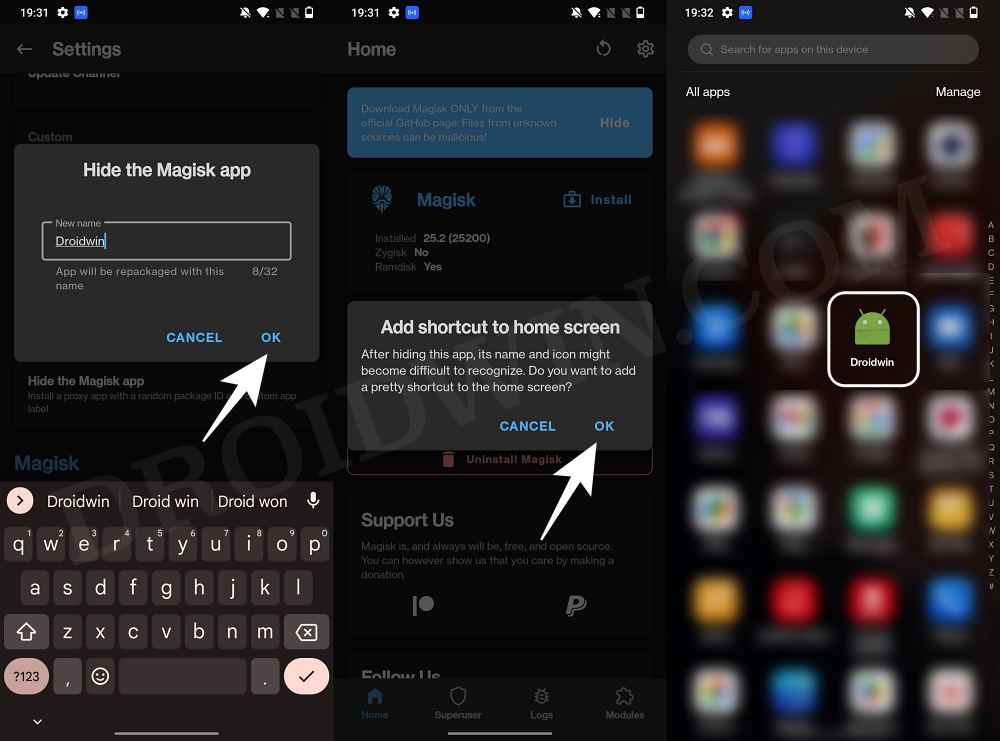
STEP 1: Hide Magisk App
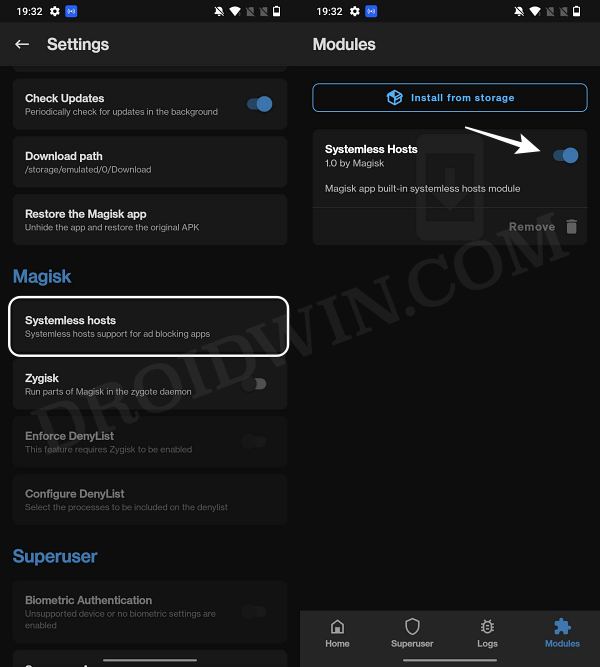
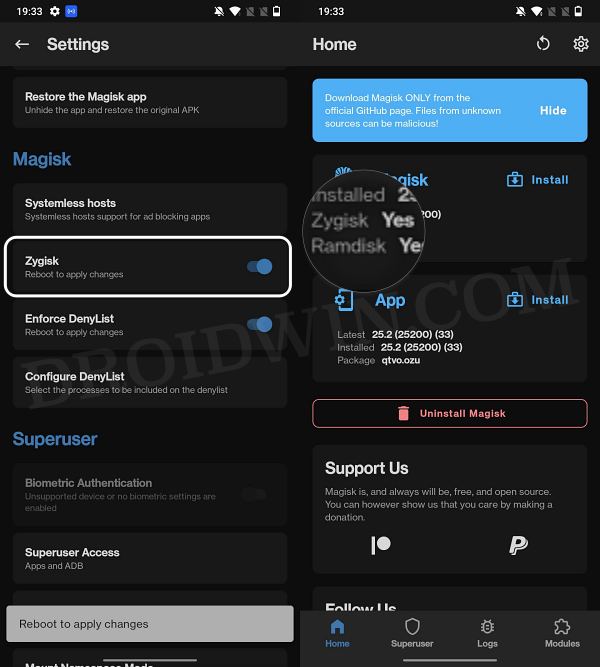
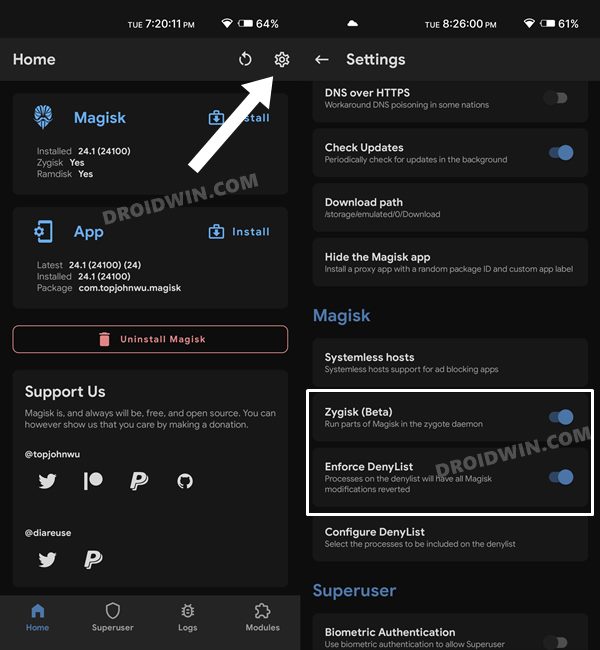
STEP 2: Enable Systemless Hosts
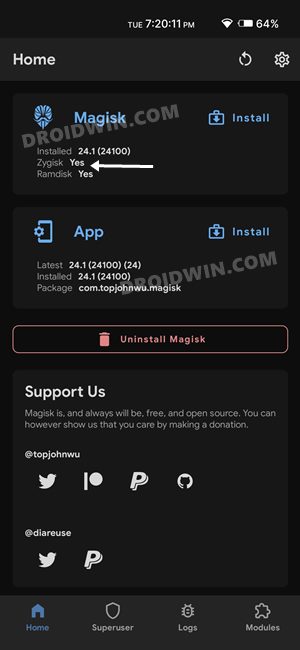
STEP 3: Enable Zygisk
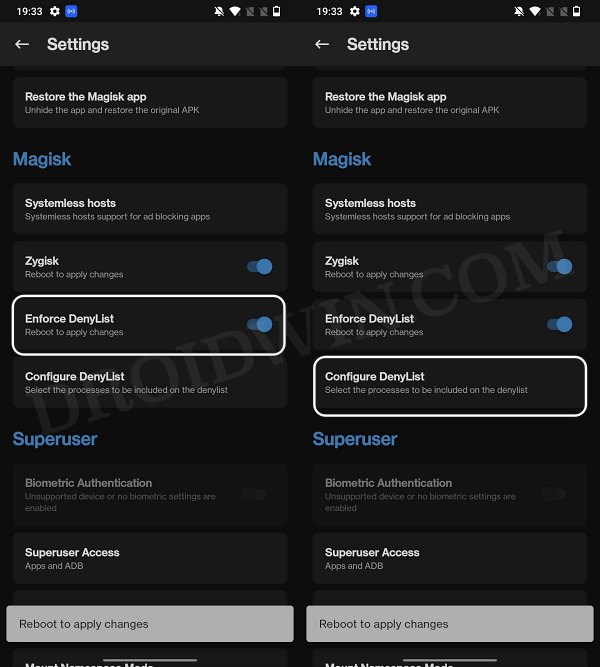
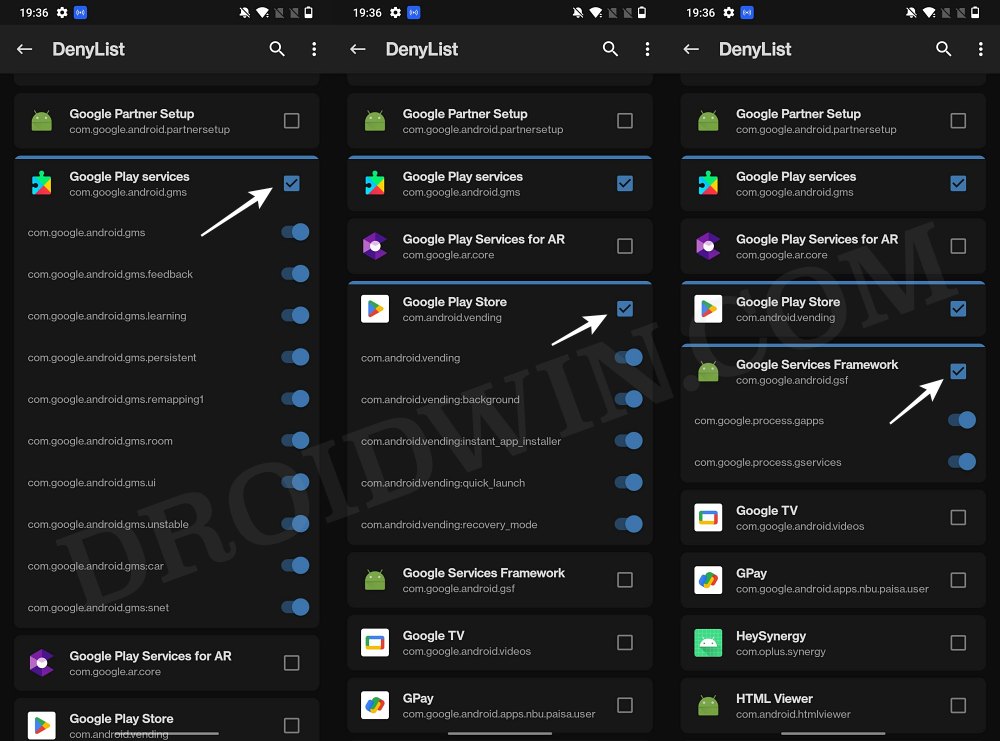
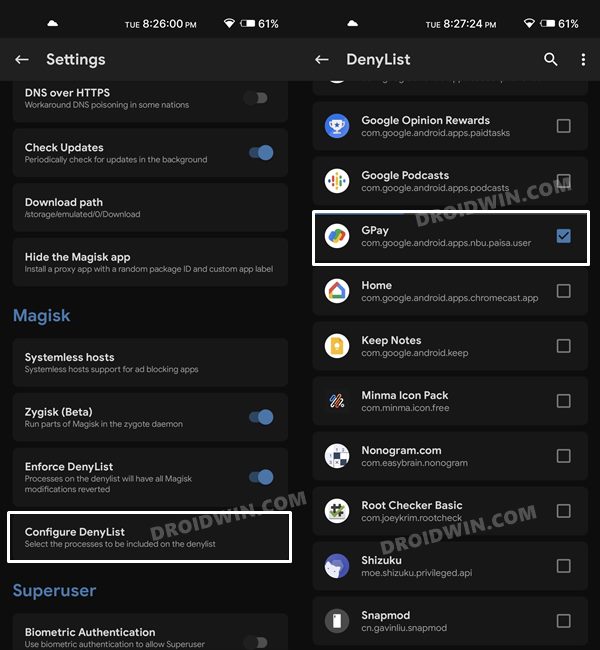
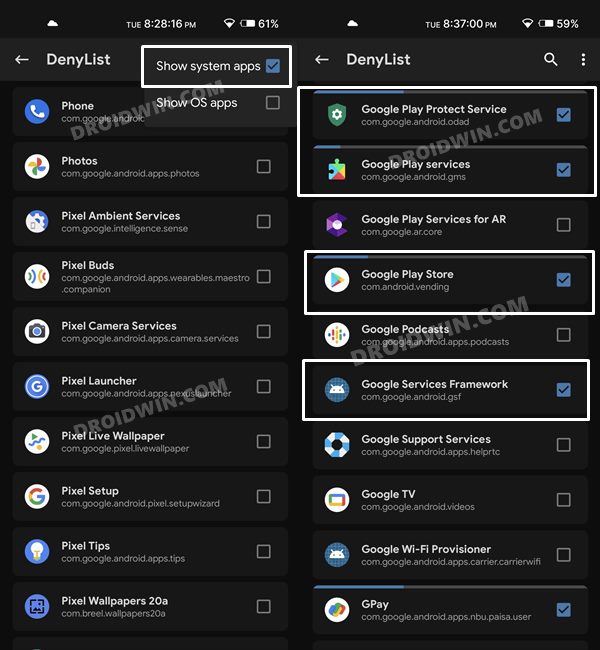
STEP 4: Configure Denylist
Denylist is the new name for the traditional Magisk hide. You could use this functionality to hide root from the desired apps, apart from the three compulsory apps listed below.
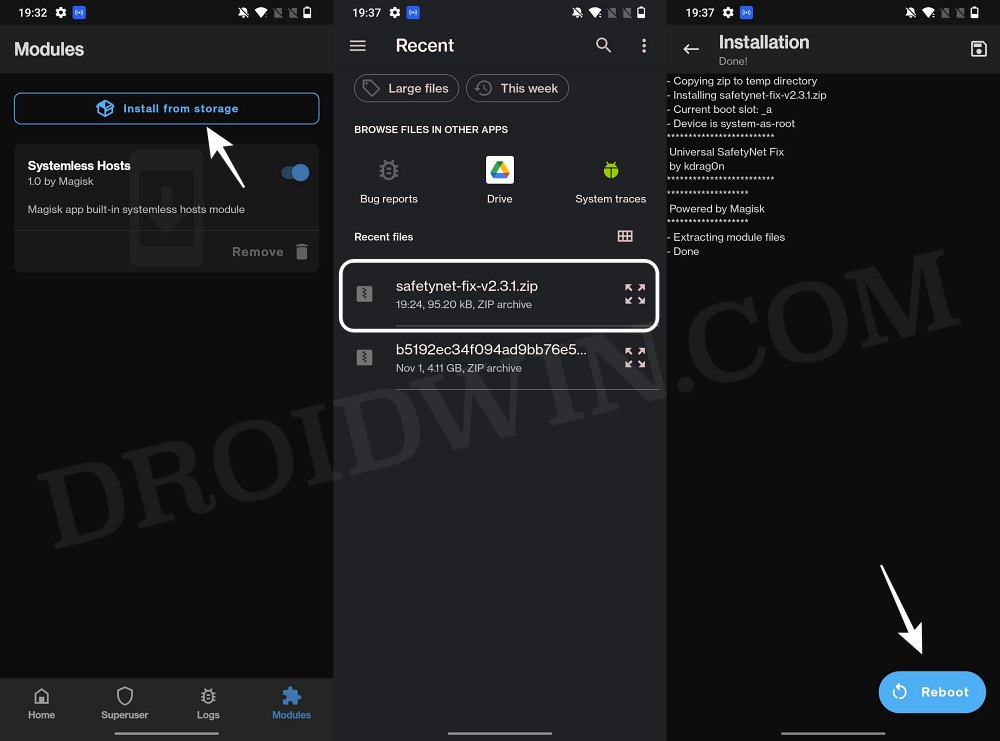
STEP 5: Flash Universal SafetyNet Fix Module
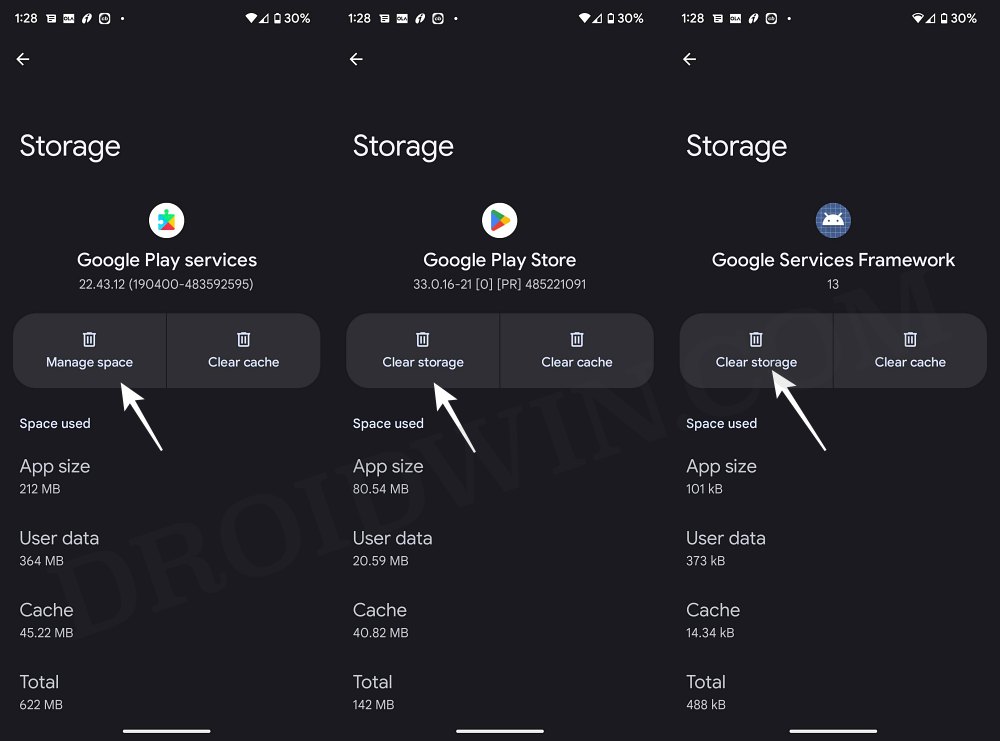
STEP 6: Delete Data
You will now have to delete the app data of all the apps from which you have hidden root. These include the compulsory Google apps and the desired apps of your choice.
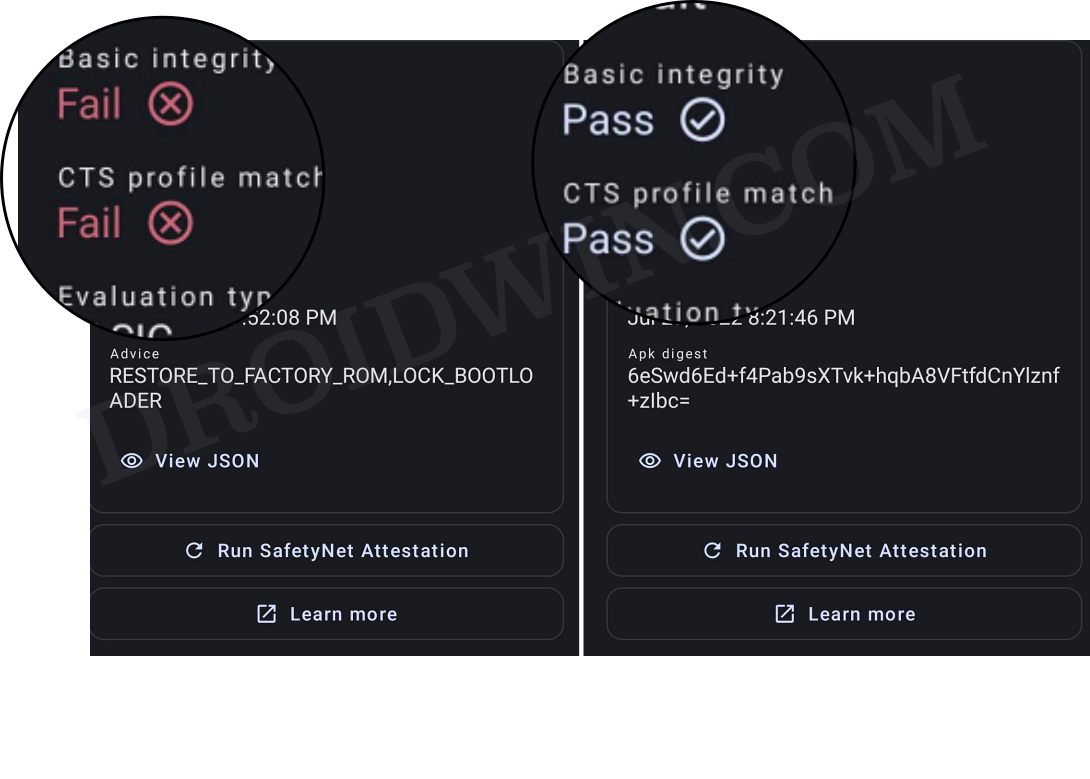
STEP 7: Check SafetyNet Test Results
That’s it. This was the first method to pass SafetyNet on your rooted Galaxy S23/Plus/Ultra. Let’s now make you aware of the second approach.
METHOD 2: Pass SafetyNet using Magisk Hide Props Config [OLD]
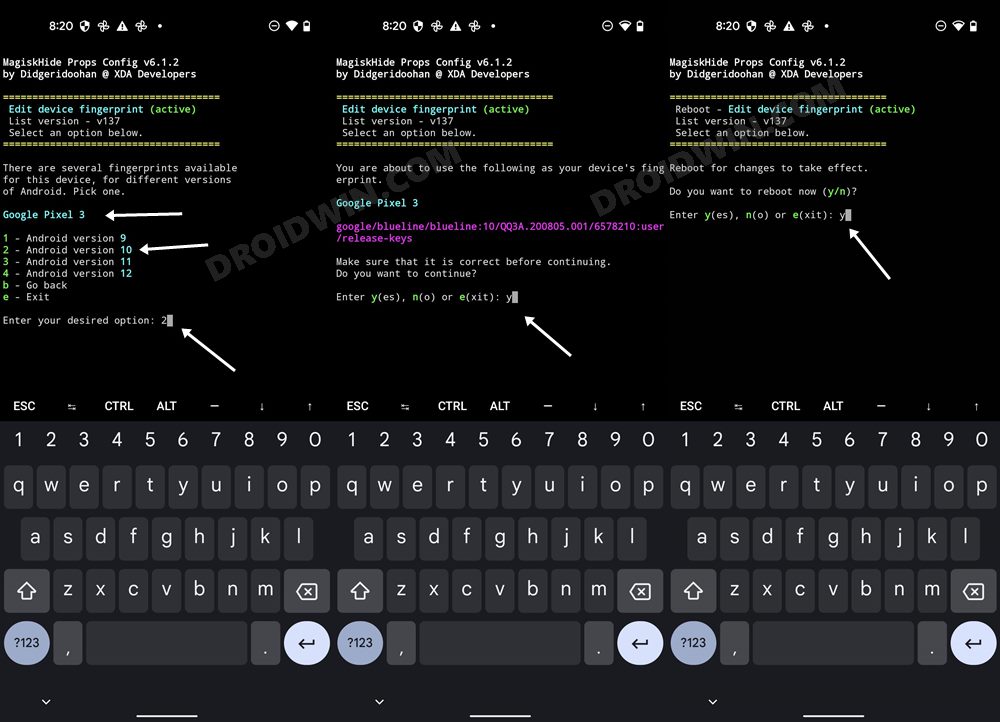
This is the lengthier of the two methods and involves spoofing the device’s fingerprint to one of the older devices that followed Basic Attestation and were easier to bypass.
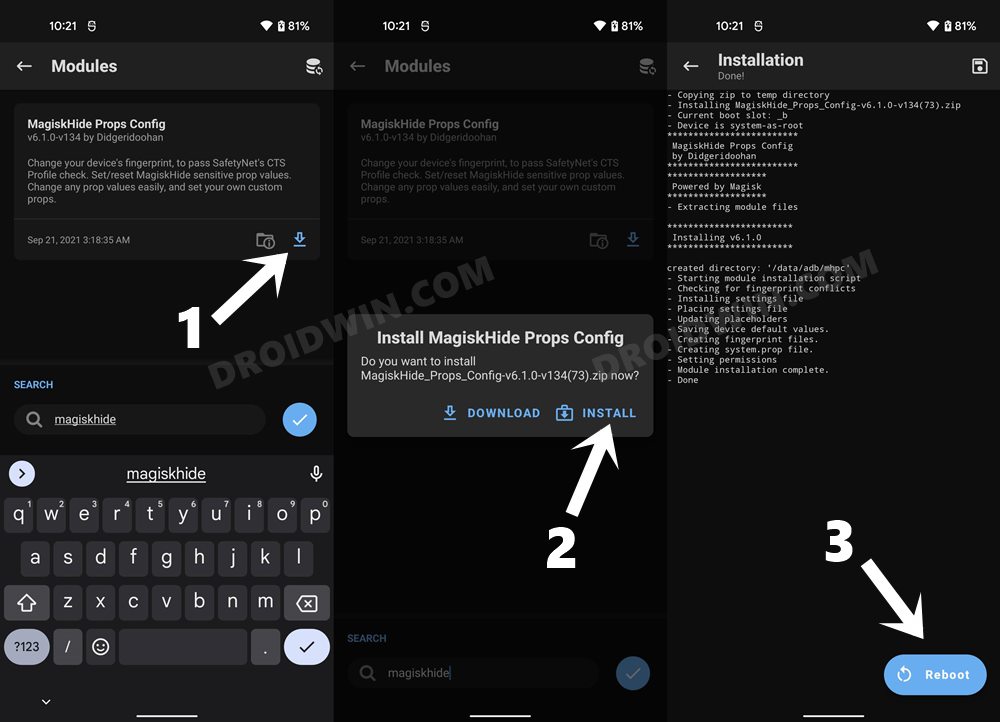
STEP 1: Install MagiskHide Props Config
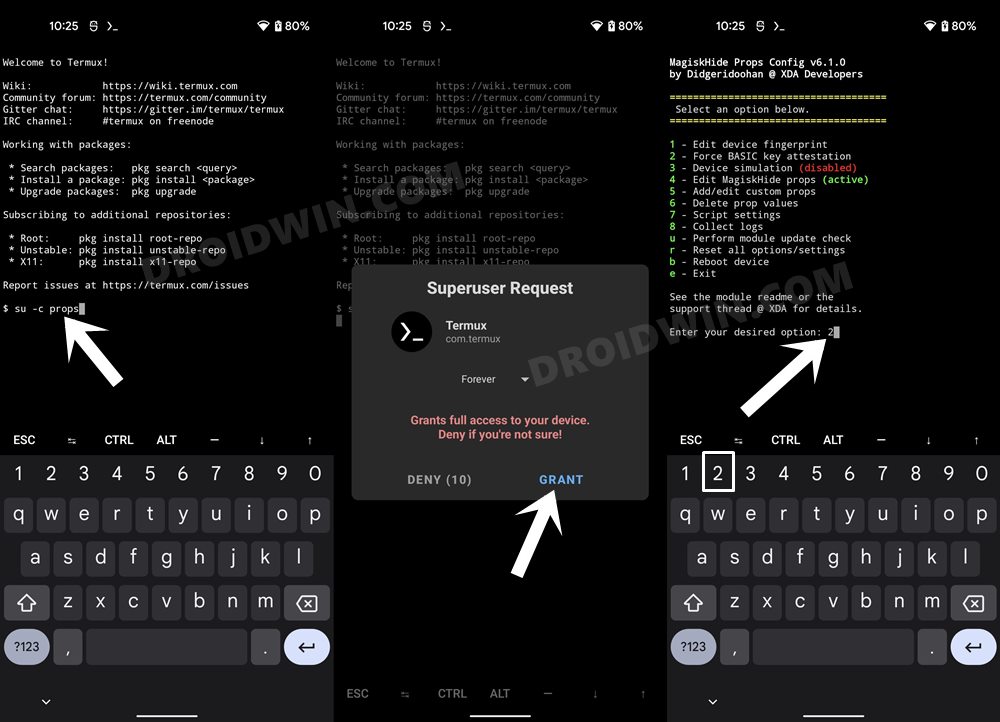
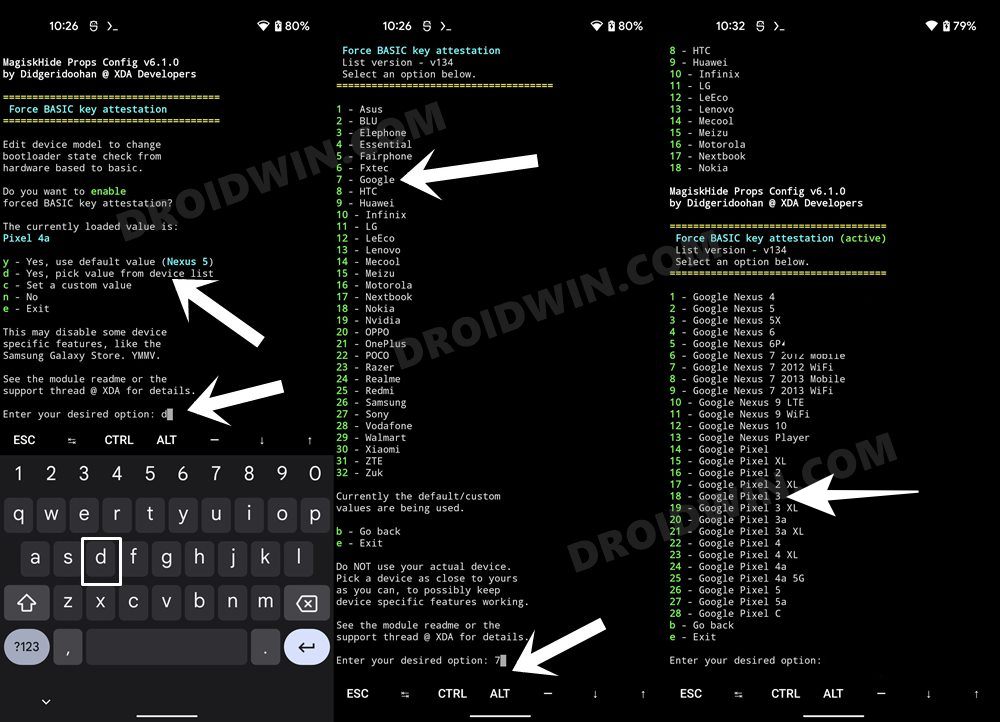
STEP 2: Force Basic Attestation
We will now be starting with the implementation of the BASIC attestation on top of the hardware-based so that it becomes easier to bypass. Here’s how it could be done:
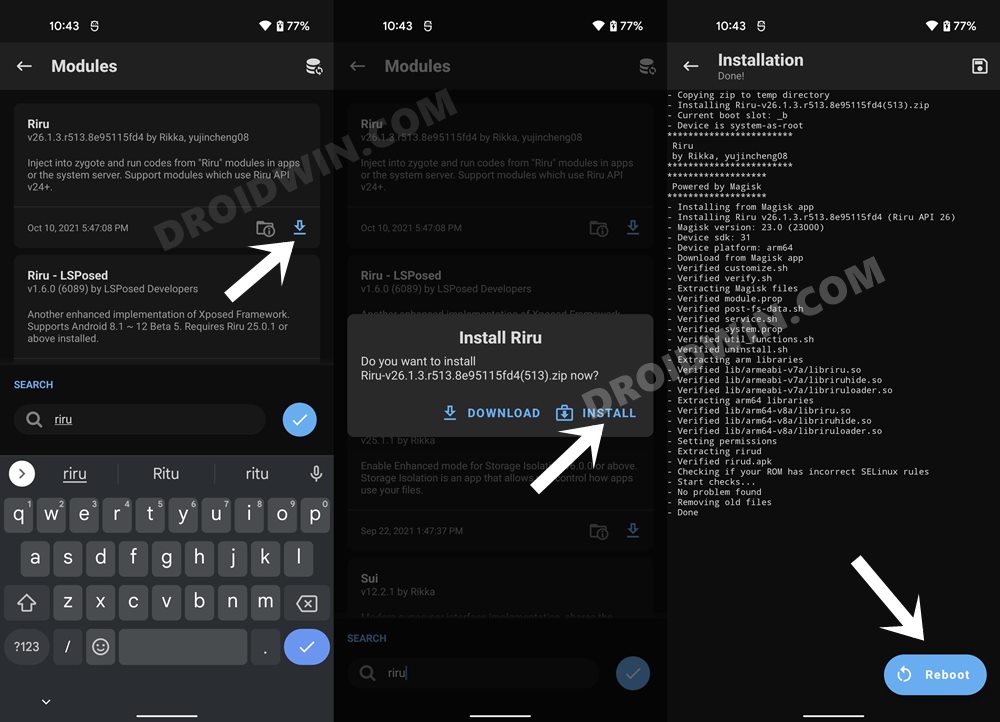
STEP 3: Instal Riru Module
Next up, you will have to install the Riru Module, which is a prerequisite for the SafetyNet Fix Module (STEP 5).
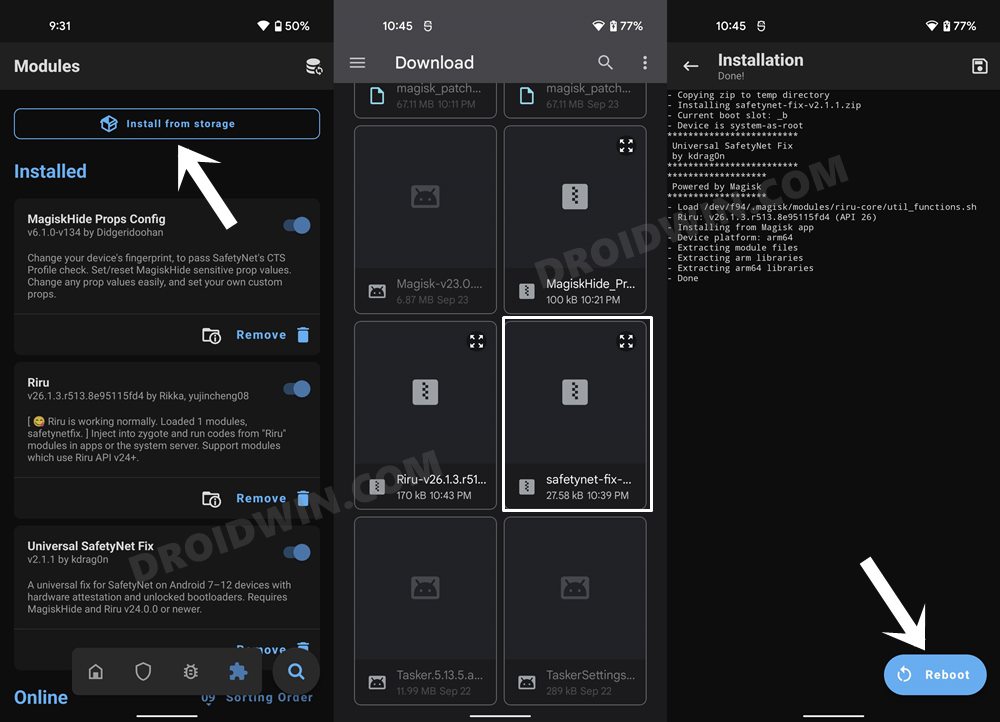
STEP 4: Flash SafetyNet Fix
We will be using the new Safetynet Fix module created by XDA Senior Member displax which works perfectly with devices launched with Android 13 out of the box.
STEP 5: Enforce Deny List and Enable Zygisk
Deny List is the new name for Magisk Hide. For the unaware, it is the feature through which you could hide root from various installed apps onto your device. So let’s first enable this Deny List and then configure it according to the requirement.
STEP 6: Configure DenyList
STEP 7: Hide Magisk App
STEP 8: Delete Play Service and Play Store Data
STEP 9: Check SafetyNet Results on Galaxy S23/Plus/Ultra
Now that we are done with all the hard work, let’s check out the associated rewards. Do note that Magisk has now removed the option to check SafetyNet. So you will now have to take the help of a third-party app. As for this guide, we will be using the YASNAC – Yet Another SafetyNet Attestation Checker. That’s it. These were the two different methods to pass the SafetyNet Test and hide root from apps on your rooted Samsung Galaxy S23/Plus/Ultra. If you have any queries concerning the aforementioned steps, do let us know in the comments. We will get back to you with a solution at the earliest.
How to Pass the SafetyNet test after installing Xposed or EdXposedFix Magisk Safetynet API Error: Detailed GuideHow to Fix ctsProfile Mismatch Error on Rooted AndroidBootloop after installing/updating Magisk: How to Fix
About Chief Editor
